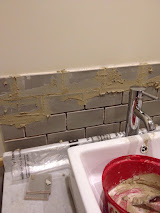
I am using brick shaped tiles. I love their more contemporary style in a period cottage. Firstly I had to attach a batten of wood to the wall to allow me to rest the first row of tiles onto. You may not need to do this if you are tiling above a work top or a sink, I had a small gap behind my unit.
Next I prepared the number of tiles I needed and realising a brick pattern would need some half tiles at each end I cut these, you need to score along the tile on the front face put a matchstick of pencil underneath and then put pressure either side to split it.Tile adhesive is then applied to the wall, this comes ready to use and is applied with a notched scraper. Then you press your tile firmly onto the wall, add a tile spacer, add the next tile until you have finished your row.
Carry on adding adhesive and tiles and spacers until you have finished.
Allow to set,wipe away any adhesive on the face of the tile.
Mix the grout, make sure it is not too sloppy or it will run out of the gaps, I have used a limestone coloured grout from Fired Earth. I use a small scraper or spatula to push the grout between the tile and then wipe away the excess with a damp cloth. It looks messy but is quite easy.
Once grouted clean away any excess grout and allow to dry. Polish the tiles with a dry cloth. You may need to seal them depending upon the type of tile you are using.
Let me know if you have a go! Start with a small area such as behind a sink and then progress as you gain confidence. Good luck!


No comments:
Post a Comment